Occupancy rates is one number that as a serviced accommodation provider it is easy to get obsessed about and lay awake at night worrying about.
Whether you own the property or are R2R’ing the property, your success is defined by your occupancy rates. Every day a property is empty, it is costing you money and wrecking your occupancy rates.
No matter where you are advertising, Airbnb, Booking.com or any of the other portals, great photos get more clicks!
Hopefully, you know you need photos when you are advertising your property, although, I still see adverts for properties without photographs.
With all the property training companies pushing serviced accommodation as the next gold rush for investors (it was HMOs a few years ago), it is no surprise that this sector is getting more competitive.
Property Photographs for Airbnb & Booking.com
On most of the portals you are competing against hotels that have dressed their professional photos to perfection. Badly lit photos of bare mattresses just don’t cut it.
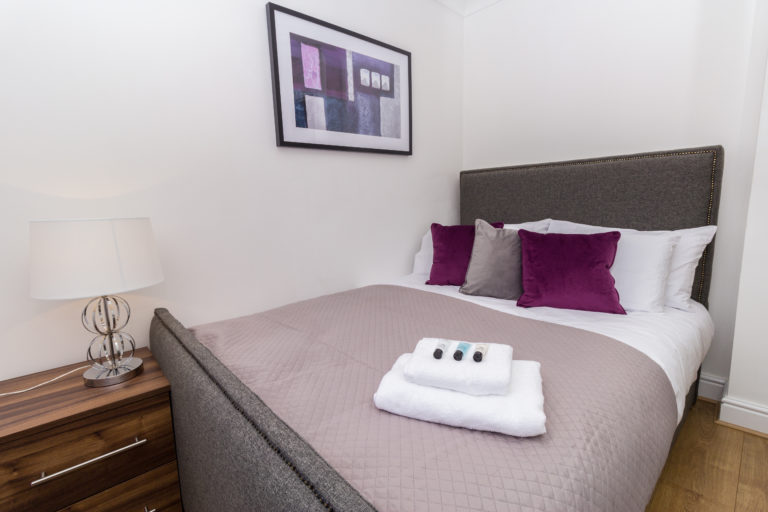
Take a look at the two photos below. If you were looking for a holiday property on Airbnb or Booking.com, which one are you more likely to click on?
The photograph on the left is not too bad, I have seen a lot worse being used to advertise properties. However, let’s face it, you are more likely to click on the one on the right.
It is time to take action and get your occupancy rates to where they should be. Take the first step and refresh your adverts on Airbnb and Booking.com with some great photos.
If you have the skills and equipment, dress your properties and take the photographs yourself. If not, hire a pro. Let’s put it into perspective, for most of the serviced accommodation properties I photograph, just one extra night’s booking covers the cost of professional photos.
More Than Just Corner To Corner Shots
For serviced accommodation and I believe any property you need to do more than just show the property, you need to show the lifestyle as well.
Room shots are great for showing the property but you need to be selling more than just that. Take some lifestyle photos as well. Here are a few examples:
The way that we hold the camera is important to minimise camera shake and therefore, to improve the property photographs that we take. Holding the camera like a pro is easy.
Let’s jump start into it.
Hold the camera with your left hand so that the weight of the camera is balanced in your hand without you having to hold it.
Next, wrap your left-hand fingers around the lens and your right hand around the right side of the camera, so that your forefinger rests on the shutter release button.
Now raise the camera so that your right eye is looking into the viewfinder. Keep your elbows tucked in tightly against your body. Make sure your feet are apart giving you a stable standing position.
It may feel weird at first, especially if you have already gotten into a habit of holding the camera a different way. However, if you persevere you may find that you get better shots with less camera shake.
Now take some photographs. When you are taking a photograph, try half pressing the shutter release button before fully pressing it to take the photograph. This will allow the auto focus function to focus the camera before you take the photograph.
Getting good quality photographs are key to the successful marketing of your property. Great photos can generate more interest quickly, which ultimately can result in more money for you! This article explains what you can do to get your property ready for the photographs to be taken.
Getting Ready
The following is good preparation for making sure you get great property photographs:
Clean and tidy the property throughout
Declutter (inside & out)
Clear and wipe off all surfaces
Clean windows (in/out), mirrors, screens etc
Remove cobwebs
Hide dish soaps, sponges, carrier bags and paper towels.
Set up the kitchen or dining table with nice set of dishes.
Remove everything from the top and doors of the fridge. This includes magnets, business cards, photos, etc.
Hide any toiletries that are in the shower or bath, as well as on the counter.
Toilet seats and lids down
Move furniture that affects the ‘flow’ of the room. Careful of moving tables etc as they may leave marks
Move/hide cables
Open curtains and blinds
Turn TVs/monitors etc off
Remove pets and evidence of pets
Cut the grass
Weed the garden
Move bins (inside & out)
Move vehicles from driveways
Dress the rooms, inject some colour
A bowl of fruit or bouquet of flowers can be a nice touch.
After you (or someone else) have prepared the property, walk around the property making sure you are really looking at the rooms, change anything that you don’t like for the photographs. As it can be difficult to see the ‘obvious’ issues in our own homes, perhaps ask a friend to help.
I hope the above has helped you to get great property photographs.
As a result of an earlier article that I wrote on which camera to buy, I got a lot of feedback. I kept hearing things like – “OK Paul, we have bought a DSLR like you suggested but we have no clue what all the buttons do”. If you were one of those people, this article is for you
There are many makes and models of Digital SLR cameras on the market but fundamentally, they all do the same thing. In this section I will explain the key features of most cameras. I suggest you get your camera out and locate each of these features. As boring as it is to read your camera’s user manual, this is the best way to get to grips with the functions and features of your specific camera. However, you may want to go through this article first so that you understand a lot of the terminology that will be used in the user manual.
Unfortunately, none of the camera manufacturers use all the same names for each function. Therefore, if I have listed a function below and you can’t find it on your camera, it is worth Googling it to seem what it is called by your camera. For example, some manufacturers call ISO Sensitivity.
Camera Body: The main part of the camera that contains the camera controls.
Power Switch: This is how you turn the camera on and off.
Shutter Release Button: This is the button you press to take the photograph.
Battery Compartment: This is where the battery goes in the camera.
Memory Card Slot: This is where the memory card goes in the camera.
Flash Connector/Hot Shoe: This is where you attach an external flash. It is normally on the top of the camera.
Tripod Socket: This is where you attach a tripod. It is normally on the bottom of the camera.
Terminals: Often under a little cover, this is where you can attach wired connectors, microphones, wired remote switches etc.
Mode Dial: This is used to select different camera modes such as Manual, Shutter Priority and Aperture Priority.
Dial (Canon call this ‘Main Dial’, Nikon call this ‘Sub Control Dial’): This is used to adjust settings such as Aperture and Shutter Speed.
Lens Cover: A removable cover on the end of your lens.
Lens: The optical lens attached to the camera body. Different lenses can be attached to the camera body.
Lens Release: The button that is used to release the lens from the camera body.
Lens Hood: Commonly used with wide angled lens to block light from causing flare on a photograph.
Lens Stabilisation: Used to reduce camera shake when hand holding a camera at slow shutter speeds. Useful for still and slow moving subjects. Switch it off when mounting the camera on a tripod or photographing fast moving subject.
Zoom Ring: The ring on the lens nearest the camera body used to control the zoom on a zoom lens.
Focus Ring: The ring on the lens furthest from the camera body used to control the manual focus when the lens is in manual focus mode.
Sensor: This is the digital equivalent of film. The sensor is made up of millions of light sensitive pixels that capture light and convert them into the photograph. The more pixels on your sensor the better the quality of the image. A pixel is a single unit of light that when put together with all of the other units of light make up a photograph.
Display: The screen where settings and photographs can be viewed.
Live View: The button to press to see the scene the camera is pointing at on the display rather than through the viewfinder.
Magnifying Buttons: Buttons used to zoom in and out when the camera is in Live View mode.
Direction Buttons: Used to control the selection of the magnified area when the camera is in Live View mode.
Manual / Auto Focus: A switch on the lens to set either manual or auto focus.
Auto Focus: The camera focuses the lens automatically.
Manual Focus: You have to focus the camera lens yourself when taking a photograph.
Auto Focus (AF) Modes: This tells the camera how to focus when you half press the shutter release button. ‘One shot’ is for still subjects and will focus only once. ‘Al Servo’ is for moving subjects, the camera will continue to refocus all the time you half press the shutter release. ‘Al Focus’ combines ‘one shot’ and ‘al servo’. It will sense when a still subject starts to move and automatically switch between modes.
Auto Focus Points: Seen in the viewfinder to tell the camera where to focus (focal point).
Info: A button to view information about camera settings or a picture. This is the button used to find a photographs histogram.
Histogram: This is a chart of the luminosity (brightness) of each pixel in an individual photograph. It is measured on a range of 0 to 256 with the darkest being on the left (0) and the brightest being on the right (256). The chart measures the number of pixels at each point in the range from 0 to 256. If there is a concentration of pixels on the far left or right of the histogram this may suggest that detail has been clipped (lost) and you may wish to adjust the exposure. However, some pictures will have clipping, for example where shot against a bright white background. There is no perfect shape of a histogram and at this stage in your photography journey, I recommend that you do not get too hung up on histograms. Just be aware what they are and it may be something to revisit later in your photography journey.
Menu: A button to view the main menu of camera settings.
Drive Modes: With drive modes you can set the camera to take single shots, continuous shots, remote controlled or self-timer shots. More on this later.
Playback: This is where you can view the photographs that you have captured.
Trash: Use this button to delete photographs. Be careful, with some cameras you can delete all photographs on the card with this button.
Any job is easier if you have the right tools. They don’t have to be the best or the most expensive but they do need to be fit for purpose.
Let’s start by looking at cameras.
The Camera & Lens
You might have heard that you need something called a ‘Full Frame’ camera or a ‘Professional Camera’ to take great property photographs. It just is not true. A ‘Full Frame’ camera will have a high megapixels number which means you can blow up the photos to be very large. This is usually unnecessary for property photographs. The other thing that a ‘Full Frame’ camera gives you is a larger sensor. This means that the photograph will cover a larger area making the property look more spacious. See the image below:
The blue lines represent different sensor types and the size of the image they may capture. Please note, this image is just to explain the point, the sizes may not be exact.
If you don’t have a ‘Full Frame’ camera, a way to mitigate this is to use a wide-angle lens. For example, I use a 10mm – 18mm lens for most of my property photographs.
The 10mm setting of the lens will give a wide-angle effect making the room look as large as possible.
‘Full Frame’ and ‘APS’ are both types of Digital Single Lens Reflex camera. The ‘Full Frame’ camera has a large sensor but an ‘APS’ camera with a lens that goes down to 10mm will do a good enough job for most people. An ‘APS’ camera is a lot cheaper than a ‘Full Frame’ camera and I believe an acceptable compromise. You can pick up a refurbished mid-range ‘APS’ camera for just a few hundred pounds. A 10mm-18mm even brand new will probably be less than a couple of hundred.
Let There Be Light
Once you have the camera and the lens. The other equipment to consider is a speedlite flash and a tripod. The key to great property photographs is to make them look bright and colourful. You want to get as much light into the shot as possible. speedlite flashes are great for this and can be picked up very cheaply. Even these cheap speedlite flashes can take a light reading from the camera and automatically set the strength of the flash. Personally, I prefer to use the speedlite flash in manual mode as I believe you get better results. The Neewar speedlite flashes do the job and are very cheap.
A word of caution when using a flash, make sure you don’t ‘blow out’ the windows. If you are taking a photo of a conservatory or lounge with beautiful views or a nice garden, you want to see them in the photo. However, the mistake that a lot of people make is that they don’t get the flash setting right and ‘blow out’ the windows so that you can’t see through them. The way to avoid this is to set the camera exposure for the window in the room before turning your flash on. Once you have the exposure right for the windows, add the flash to light up the room. Bounce the flash light and make sure it won’t reflect in windows and shiny surfaces. A diffuser over the flash or a light stand and umbrella can help.
Post Processing
Post processing software is not strictly ‘camera gear’ but as we are talking about bright and colourful photographs, I have to mention it. Most people have heard of Photoshop. It is a powerful tool but not the one I would use for editing property photographs. I use its sister, Lightroom. The editing capabilities of lightroom are not as good as Photoshop. However, in Photoshop you work on one photo at a time. In lightroom you load all of the photos at once and can work through them a lot quicker. If you need big edits done, like cars removed from a driveway, that would need to be done in Photoshop. However, even I would not do that myself, due to the time it would take me. I would send that photo to an editing agency who will do it for just a few pounds. If you are going to post process the images, make sure you take the photographs in RAW format.
Tripods
The other bit of equipment to consider is a tripod. I will be honest, I try to avoid using one as they slow you down. However, sometimes the only way to get enough light into a shot is to use a slow exposure. If you hand hold the camera with a slow exposure you are guaranteed camera shake. Tripods can be picked up very cheaply. Here is an example of a photo where I had no choice and had to use a tripod:
More on Cameras
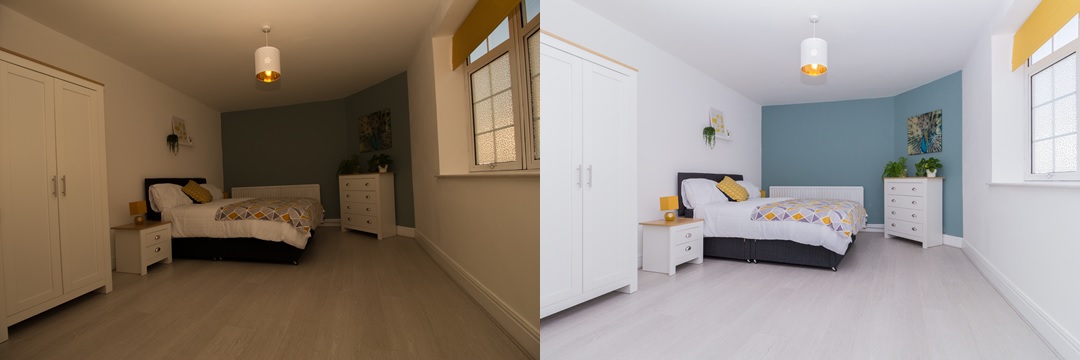
I just want to go back to cameras. Hopefully I have persuaded you to go with an ‘APS’ DSLR camera. If so you can ignore this paragraph. However, if you are still looking at other types of camera, read on. You need a camera that gives you a depth of field of at least f11. Many Bridge camera only go as high as f9. I take most property photographs in Manual mode but as a minimum you will want to be able to prioritise the shutter speed and aperture. So make sure your camera has those settings. A camera that allows you to adjust the white balance is really important for the internal photographs, if you want to get the colours right. The photo below shows the difference between getting the white balance right or wrong.


Recent Comments